February 2026

Our rich text editor has received a major upgrade!
The rich text editor is the formatting toolbar you use to style text, add links, and insert images in areas that allow formatted text. It's also known as a WYSIWYG or "What You See Is What You Get" editor, since the editing screen simulates the final result instead of showing source code. The new editor offers usability improvements and a foundation for integrating AI into the authoring experience.
When editing text in a page's body content, Custom Text/HTML widgets, and other formatted text fields, you'll notice:
- a refreshed toolbar with common styling options
- a more intuitive experience for inserting media, allowing you to easily select sizes, set alignment, and add captions
- a more intuitive experience for inserting links, allowing you to select from existing content and turn links into buttons
- minor changes to the size or position of embedded images
Read on for more details about these changes. Questions? Reach out to support@theopenscholar.com.

What has changed with media?
Insert images, videos, and more from the modern media library
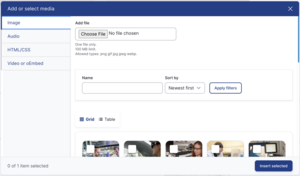
Clicking the "Insert Media" button on the toolbar will now open the same media library that you see on other image and media fields throughout the platform.
The media is organized onto tabs by type: Images, Audio files, HTML/CSS snippets, and Video or oEmbeds. You can upload new media or select from items in your site's library.
Selecting the size of your media
After inserting your image or video, click on it to change the size and customize other options.
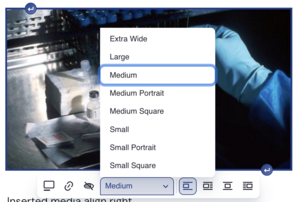
There are several preset sizes you can choose from, including portrait and square styles for images. Having consistent sizes will create a cohesive look across pages and make your site look polished and professional. You can easily switch between sizes until you find the one you like best.
Shifts in image size or position
Because there is a new set of image sizes, you may notice some minor changes to the size or position of previously embedded images. There shouldn't be any impact on the overall effectiveness of your content. If you run into a display issue that you can't adjust yourself, please contact our support team.
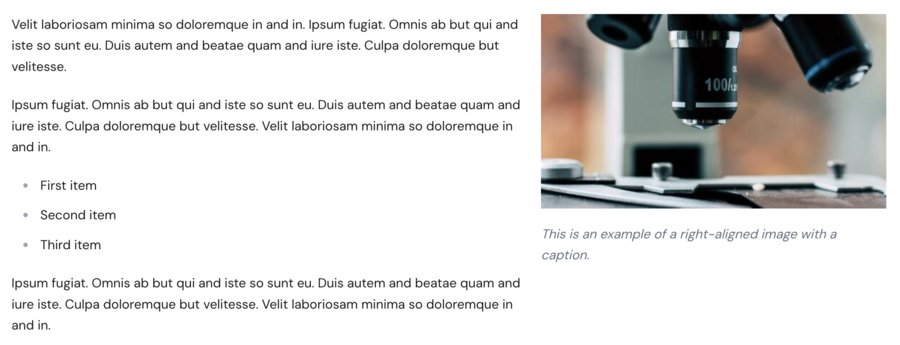
Aligning and captioning media
The media dialog gives you the ability to align the media left, right, or center, or to turn it into a link. For images you can add a caption underneath or customize the alt text. Alt text is the "alternative" text that is shown to assistive technology and search engines who can't actually see the image.
What has changed with links?
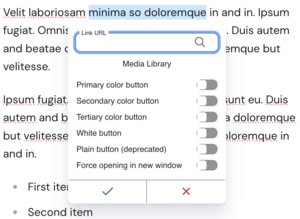
Inserting links with the new dialog
When you highlight text and click the "Insert Link" button, you'll notice that the dialog for adding your link URL pops up right next to the text you are editing.
You can add several kinds of links:
- Select from your site's content - click in the "Link URL" field and start typing. You'll be able to select from a list of pages or media files found on your site.
- Other internal links - if the page you want doesn't appear in the autocomplete field, simply type the page path as it appears after the main domain, i.e. "/mysite/my-special-page"
- External links - if you want to link to another website, enter the full URL including the "https://" at the beginning.
- Linking to files - click on the "Media Library" button that appears below the "Link URL" field to open the media library and select any document or image on your site.
- Email addresses - highlight the text, enter the email address in the Link URL field, and select the dropdown that appears below, "Opens your mail client ready to e-mail [address that you entered]." Any email address in the rich text editor will automatically be converted into a link, so this step is only necessary if you have a phrase like "Email us" or "Send us a message" that you wish to turn into an email link.
Styling links as buttons
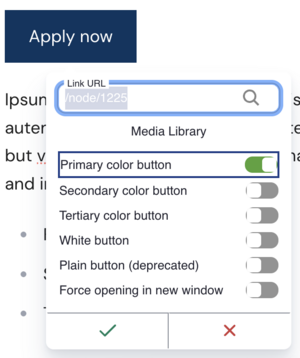
Sometimes you want a link to stand out as a call to action. To make it look like a button, click on the link and turn on one of the toggles for button styles.
Setting links to open in a new window
Click on the link and turn on the toggle for "Force opening in new window."
This option should be used sparingly. Accessibility experts advise not to open new windows for links, even links to external sites, because it can confuse users and prevent them from navigating back to where they started.
Only use this setting if the information you are linking to is supplemental and you do not want the reader to lose their place on the page. A common situation for this is help text on forms, where the user would lose the information they have already filled out if the link opens in the same window.
Retired features
The upgraded text editor does not allow clicking and dragging to set arbitrary sizes for images and video. As described above, authors can select from several preset styles.
The upgraded text editor does not include buttons for customizing colors and fonts. To ensure that all OpenScholar sites meet accessibility and branding standards, content authors will not be able to set arbitrary colors or font sizes. You can use the Headings dropdown to apply hierarchical structure to your content and make the page easy to scan. Your theme applies a consistent color palette and allows customizing certain elements, like buttons and custom text blocks, with colors from your organization's approved palette.
For advanced HTML and style customizations, you can continue to use the Embed Media widget. Your mileage may vary. We cannot guarantee that custom styles added this way will continue to work as we update themes and modernize the platform.
What's coming next?
Now that we are on the latest version of the text editor, we plan to introduce AI-assisted content authoring. We are exploring the addition of tools to generate and summarize content, adjust tone, translate into other languages, and more. Stay tuned!
If you have feedback about the new authoring experience, please reach out to our product team at support@theopenscholar.com.